If you managed to finish the previous tutorial (Magento 2 – create a table in the database & handle data), that’s fantastic, because now we will go a step further and create a space in the admin panel to handle our blog posts (for now we will focus on creating a grid with data from the database on the admin panel side). If you haven’t finished the previous tutorial – be sure to do it, because in this article we will use that module as a starting point.
The module that we created in the previous tutorial made it possible to create a database with a specific structure and model, resource model, and collection.
At the beginning of this tutorial, we will create an example record for the database (the table can of course be left blank, but creating an example record will allow us to see the results of our work in the admin panel, so I do not recommend skipping this step).
STEP 1. Add a record to the database via UpdateScript.
Let’s assume that the current version of our module is 0.0.1 (this can be checked in the module.xml file or in the database in the “module_setup” table). Let’s change the setup_version (to “0.0.2”) in the
app/code/PandaGroup/MyAdminController/module.xml
Next, let’s create a simple setup file:
app/code/PandaGroup/MyAdminController/Setup/UpgradeData.php
<?php

namespace PandaGroup\MyAdminController\Setup;

use Magento\Framework\Setup\UpgradeDataInterface;
use Magento\Framework\Setup\ModuleDataSetupInterface;
use Magento\Framework\Setup\ModuleContextInterface;
use \PandaGroup\MyAdminController\Model\BlogFactory as BlogFactory;

class UpgradeData implements UpgradeDataInterface
  {
    protected $_blogFactory;

    public function __construct(BlogFactory $blogFactory)
  {
    $this->_blogFactory = $blogFactory;
  }

    public function upgrade(ModuleDataSetupInterface $setup, ModuleContextInterface $context)
  {
    if (version_compare($context->getVersion(), '1.1.2', '<')) {
    $data = [
    'title'        => "Test title",
    'content'      => "Test content",
    'status'       =>  1,
    'slug'         => "test slug",
    'tags'         => 'tag',
    'image'        => "test.jpg",
    ];
    $newBlogPost = $this->_blogFactory->create();
    $newBlogPost->addData($data)->save();
  }
  }
  }
Note: We declare “use \PandaGroup\MyAdminController\Model\BlogFactory as BlogFactory;” although this location does not physically exist, the M2 will handle such a declared Factory.
Run: php bin/magento setup:upgrade
STEP 2. Create space in the admin menu
Let’s start by creating the file:
app/code/PandaGroup/MyAdminController/etc/adminhtml/menu.xml
In the file, we only need to declare the appropriate items in the admin panel – in our example, add PG BLOG to the main menu (sidebar) and add a submenu with the BLOG POSTS item.
<?xml version="1.0"?>
<config xmlns:xsi="http://www.w3.org/2001/XMLSchema-instance" xsi:noNamespaceSchemaLocation="urn:magento:module:Magento_Backend:etc/menu.xsd">
    <menu>
        <add id="PandaGroup_MyAdminController::menu" title="PG Blog" module="PandaGroup_MyAdminController" sortOrder="100" resource="PandaGroup_MyAdminController::menu"/>
        <add id="PandaGroup_MyAdminController::blog" title="Blog posts" module="PandaGroup_MyAdminController" sortOrder="10" action="pandagroup_myadmincontroller/blog" resource="PandaGroup_MyAdminController::blog" parent="PandaGroup_MyAdminController::menu"/>
    </menu>
</config>
Run: php bin/magento cache:clean
STEP 3. Create admin routing and controller
In the previous step, we have already created a simple menu structure and declared a route (action = “pandagroup_myadmincontroller/blog”), to which we will be redirected after clicking on BLOG POST. So at this point, we need to add the appropriate routing and controller to display what we want.
Let’s create the following file: app/code/PandaGroup/MyAdminController/etc/adminhtml/routes.xml
<?xml version="1.0"?>
<config xmlns:xsi="http://www.w3.org/2001/XMLSchema-instance" xsi:noNamespaceSchemaLocation="urn:magento:framework:App/etc/routes.xsd">
    <router id="admin">
        <route id="pandagroup_myadmincontroller" frontName="pandagroup_myadmincontroller">
            <module name="PandaGroup_MyAdminController"/>
        </route>
    </router>
</config>
Then let’s add a controller:
app/code/PandaGroup/MyAdminController/Controller/Adminhtml/Blog/Index.php
<?php

namespace PandaGroup\MyAdminController\Controller\Adminhtml\Blog;

use \Magento\Backend\App\Action\Context as Context;
use \Magento\Framework\View\Result\PageFactory as PageFactory;
use \Magento\Backend\App\Action as Action;

class Index extends Action
  {
    protected $resultPageFactory = false;

    public function __construct(
    Context $context,
    PageFactory $resultPageFactory
    )
  {
    parent::__construct($context);
    $this->resultPageFactory = $resultPageFactory;
  }

    public function execute()
  {
    $resultPage = $this->resultPageFactory->create();
    $resultPage->getConfig()->getTitle()->prepend((__('Blog posts')));

    return $resultPage;
  }


  }
After adding the above files just run PHP bin/magento cache:clean.
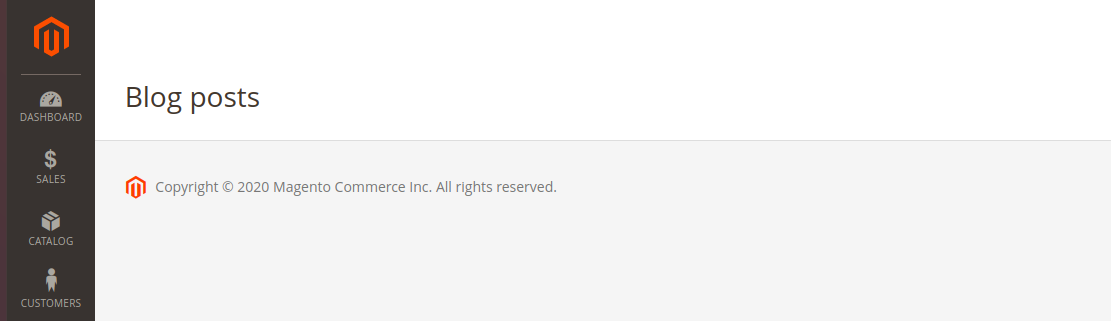
Now in the admin panel – after clicking the submenu in “Blog posts” or by entering the link: [our_domain]/admin/pandagroup_myadmincontroller/blog we are able to see the effect of our work – as in the screenshot below.
STEP 4. Create Admin Grid
Finally, we need to declare resources in the dependency injection file. Let’s create:
app/code/PandaGroup/MyAdminController/etc/di.xml
In the file, we have to declare collection, DB table name, and resource model (all these elements were created in the previous tutorial).
<config xmlns:xsi="http://www.w3.org/2001/XMLSchema-instance" xsi:noNamespaceSchemaLocation="../../../../../lib/internal/Magento/Framework/ObjectManager/etc/config.xsd">
    <type name="Magento\Framework\View\Element\UiComponent\DataProvider\CollectionFactory">
        <arguments>
            <argument name="collections" xsi:type="array">
                <item name="pandagroup_myadmincontroller_blog_listing_data_source" xsi:type="string">PandaGroup\MyAdminController\Model\ResourceModel\Blog\Collection</item>
            </argument>
        </arguments>
    </type>
    <virtualType name="PandaGroup\MyAdminController\Model\ResourceModel\Blog\Collection" type="Magento\Framework\View\Element\UiComponent\DataProvider\SearchResult">
        <arguments>
            <argument name="mainTable" xsi:type="string">pandagroup_myadmincontroller_blog</argument>
            <argument name="resourceModel" xsi:type="string">PandaGroup\MyAdminController\Model\ResourceModel\Blog</argument>
        </arguments>
    </virtualType>
</config>
Next, create a layout file for the pandagroup_myadmincontroller/blog/index action. The file will contain declarations that uiComponent should use. Add the file:
app/code/PandaGroup/MyAdminController/view/adminhtml/layout/pandagroup_myadmincontroller_blog_index.xml
(*pay attention to the coincidence with the action to which pandagroup_myadmincontroller/blog/index is assigned).
<page xmlns:xsi="http://www.w3.org/2001/XMLSchema-instance" xsi:noNamespaceSchemaLocation="../../../../../../../lib/internal/Magento/Framework/View/Layout/etc/page_configuration.xsd">
    <update handle="styles"/>
    <body>
        <referenceContainer name="content">
            <uiComponent name="pandagroup_myadmincontroller_blog_listing"/>
        </referenceContainer>
    </body>
</page>
Finally, add the ui_component that we have just declared and complete it with the data we want to display on the front (see tags <columns name = “spinner_columns”> </columns>).
In addition, it is possible to add advanced actions across the grid for a more recent action on the records. In the specified file between the tags <listingToolbar name = “listing_top”> </ listingToolbar> some such actions have been implemented – description under the screen (the screen shows tags responsible for displaying a specific item).
app/code/PandaGroup/MyAdminController/view/adminhtml/layout/pandagroup_myadmincontroller_blog_listing.xml
<listing xmlns:xsi="http://www.w3.org/2001/XMLSchema-instance" xsi:noNamespaceSchemaLocation="urn:magento:module:Magento_Ui:etc/ui_configuration.xsd">
    <argument name="data" xsi:type="array">
        <item name="js_config" xsi:type="array">
            <item name="provider" xsi:type="string">pandagroup_myadmincontroller_blog_listing.pandagroup_myadmincontroller_blog_listing_data_source</item>
            <item name="deps" xsi:type="string">pandagroup_myadmincontroller_blog_listing.pandagroup_myadmincontroller_blog_listing_data_source</item>
        </item>
        <item name="spinner" xsi:type="string">spinner_columns</item>
        <item name="buttons" xsi:type="array">
            <item name="add" xsi:type="array">
                <item name="name" xsi:type="string">add</item>
                <item name="label" xsi:type="string" translate="true">Add Post</item>
                <item name="class" xsi:type="string">primary</item>
                <item name="url" xsi:type="string">*/*/</item>
                <!-- <item name="url" xsi:type="string">*/*/new</item> -->
            </item>
        </item>
    </argument>
    <dataSource name="nameOfDataSource">
        <argument name="dataProvider" xsi:type="configurableObject">
            <argument name="class" xsi:type="string">Magento\Framework\View\Element\UiComponent\DataProvider\DataProvider</argument>
            <argument name="name" xsi:type="string">pandagroup_myadmincontroller_blog_listing_data_source</argument>
            <argument name="primaryFieldName" xsi:type="string">post_id</argument>
            <argument name="requestFieldName" xsi:type="string">id</argument>
            <argument name="data" xsi:type="array">
                <item name="config" xsi:type="array">
                    <item name="component" xsi:type="string">Magento_Ui/js/grid/provider</item>
                    <item name="update_url" xsi:type="url" path="mui/index/render"/>
                    <item name="storageConfig" xsi:type="array">
                        <item name="indexField" xsi:type="string">post_id</item>
                    </item>
                </item>
            </argument>
        </argument>
    </dataSource>
    <listingToolbar name="listing_top">
        <massaction name="listing_massaction">
            <argument name="data" xsi:type="array">
                <item name="config" xsi:type="array">
                    <item name="component" xsi:type="string">Magento_Ui/js/grid/tree-massactions</item>
                </item>
            </argument>
            <action name="custom_action">
                <argument name="data" xsi:type="array">
                    <item name="config" xsi:type="array">
                        <item name="type" xsi:type="string">custom_action</item>
                        <item name="label" xsi:type="string" translate="true">Custom action</item>
                        <item name="url" xsi:type="url" path="pandagroup_myadmincontroller/blog"/>
                        <!-- <item name="url" xsi:type="url" path="pandagroup_myadmincontroller/blog/customAction"/> -->
                        <item name="confirm" xsi:type="array">
                            <item name="title" xsi:type="string" translate="true">Make something with selected.</item>
                            <item name="message" xsi:type="string" translate="true">Are you sure?</item>
                        </item>
                    </item>
                </argument>
            </action>
        </massaction>
        <bookmark name="bookmarks"/>
        <columnsControls name="columns_controls"/>
        <filterSearch name="fulltext"/>
        <filters name="listing_filters" />
        <paging name="listing_paging"/>
        <exportButton name="export_button"/>
        <argument name="data" xsi:type="array">
            <item name="config" xsi:type="array">
                <item name="sticky" xsi:type="boolean">true</item>
            </item>
        </argument>
    </listingToolbar>
    <columns name="spinner_columns">
        <selectionsColumn name="ids">
            <argument name="data" xsi:type="array">
                <item name="config" xsi:type="array">
                    <item name="resizeEnabled" xsi:type="boolean">false</item>
                    <item name="resizeDefaultWidth" xsi:type="string">55</item>
                    <item name="indexField" xsi:type="string">post_id</item>
                </item>
            </argument>
        </selectionsColumn>
        <column name="post_id">
            <argument name="data" xsi:type="array">
                <item name="config" xsi:type="array">
                    <item name="filter" xsi:type="string">textRange</item>
                    <item name="sorting" xsi:type="string">asc</item>
                    <item name="label" xsi:type="string" translate="true">ID</item>
                </item>
            </argument>
        </column>
        <column name="title">
            <argument name="data" xsi:type="array">
                <item name="config" xsi:type="array">
                    <item name="filter" xsi:type="string">textRange</item>
                    <item name="sorting" xsi:type="string">asc</item>
                    <item name="label" xsi:type="string" translate="true">TITLE</item>
                </item>
            </argument>
        </column>
        <column name="content">
            <argument name="data" xsi:type="array">
                <item name="config" xsi:type="array">
                    <item name="filter" xsi:type="string">textRange</item>
                    <item name="sorting" xsi:type="string">asc</item>
                    <item name="label" xsi:type="string" translate="true">CONTENT</item>
                </item>
            </argument>
        </column>
        <column name="created_at">
            <argument name="data" xsi:type="array">
                <item name="config" xsi:type="array">
                    <item name="filter" xsi:type="string">textRange</item>
                    <item name="sorting" xsi:type="string">asc</item>
                    <item name="label" xsi:type="string" translate="true">CREATED_AT</item>
                </item>
            </argument>
        </column>
    </columns>
</listing>
Run: php bin/magento cache:clean
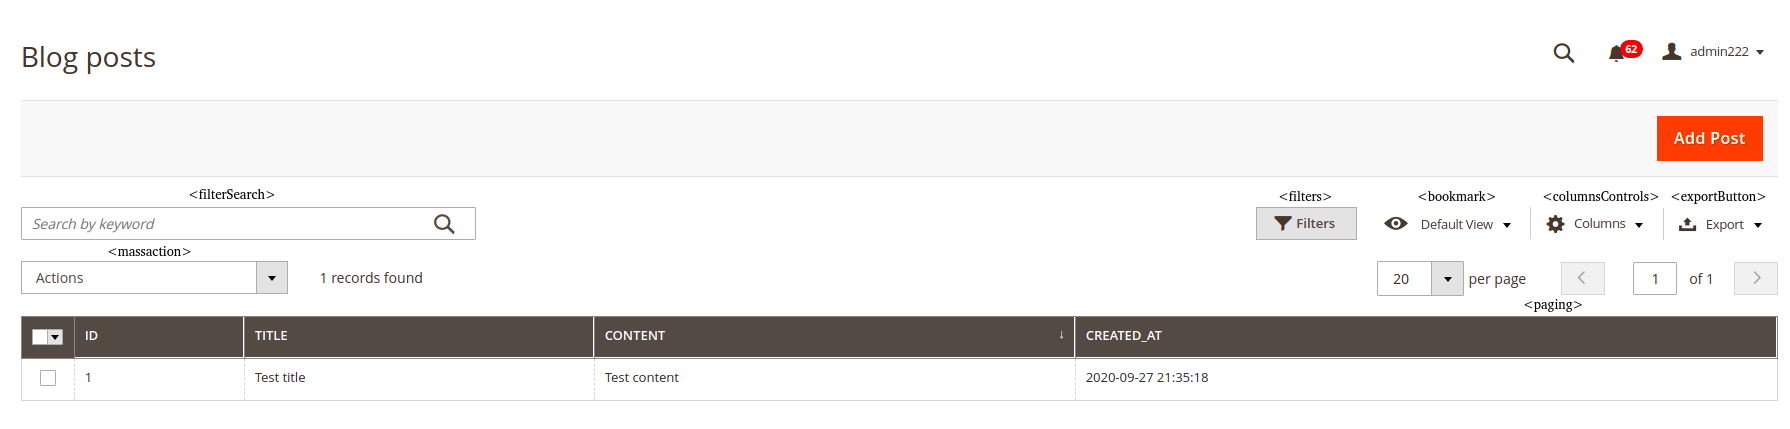
<bookmark name=”bookmarks”/> – allow admin to save specific view (e.g with columnsControls);
<columnsControls name=”columns_controls”/> – admin can choose which column are visible on grid;
<filterSearch name=”fulltext”/> – admin can search all data in the table;
<paging name=”listing_paging”/> – pagination;
<filters name=”listing_filters” /> – admin can filter data in every column;
<exportButton name=”export_button”/> – allow admin export items to CSV or XML file;
<massaction name=”listing_massaction”> -can perform some action on selected items (it can be used for mass deletion of records or other mass actions – but it requires the creation of appropriate controllers).
NOTE: Bulk Actions and “Add Post” link to the post home page. Adding, editing, deleting records, and handling of mass actions will be presented in the next article.
 (No Ratings Yet)